PrivateTax auf Mac OS X 10.7 Lion installieren

Schon wieder ein Hack! Diesmal auf Deutsch weil mit geographisch eng beschränktem, aber grossem Nutzen für diejenigen, die wie ich auf den letzten Termin im Kanton Zürich die Steuererklärung 2010 einreichen müssen, und einen Mac mit 10.7 Lion haben.

Wie jedes Jahr habe ich mir dazu das kostenlose Programm "Private Tax 2010" heruntergeladen. Da stellt sich heraus, dass dieses Programm einen PowerPC-Mac oder Rosetta benötigt, und deshalb auf Lion gar nicht installierbar ist. Toll! 5 Jahre nach der Umstellung auf Intel bei Apple!

Doch halt - PrivateTax ist doch ein Java-Programm? Das hat doch nix mit Intel/PowerPC zu tun? Ein Blick in das "Setup.app" Package zeigt sofort den Schuldigen: da ist eine Uralt-Version von InstallAnywhere (von 2006) drin.

Da war wohl jemand zu geizig (wir müssen schliesslich Steuergelder sparen, jaja), die Lizenz auch nur einmal in den letzten 5 Jahren zu erneuern.

Zum Glück ist die Lösung recht einfach: Man suche sich irgend ein halbwegs aktuelles anderes Mac-Programm, das mit InstallAnywhere installiert wird (Google - "mac installanywhere" findet allerlei). Nun öffnet man im Finder mit "Rechtsclick->Paketinhalt anzeigen" die "Setup.app" von PrivateTax und die entsprechende *.app des anderen Programms (die muss nicht unbedingt "Setup.app" heissen). Aufgeklappt sehen die Inhalte auf beiden Seiten etwa so aus:
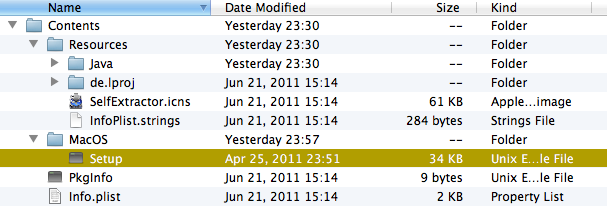
PrivateTaxInstallerContentsDas angewählte "Setup" ist das Binary des InstallAnywhere, das im Fall von PrivateTax PPC-only ist. Dieses wird nun einfach durch das entsprechende Binary aus dem neueren Installer ersetzt (wenn es im anderen Installer anders heisst, einfach in "Setup" umbenennen).

Damit ist der Installer modernisiert. Jetzt einfach direkt das "Setup"-Binary doppelclicken, dann öffnet sich ein Terminal, der Installer startet normal mit GUI, und PrivateTax lässt sich installieren. An der Stelle dachte ich schon: Geschafft! Leider noch nicht ganz.

Denn die installierte App "Private Tax 2010.app" ist technisch selber wieder ein InstallAnywhere. Das heisst, es hat genau dieselbe Struktur wie oben gezeigt, und genau dasselbe veraltete Binary, diesmal heisst es aber "Private Tax 2010". Also braucht es den gleichen Trick nochmals - einfach auch hierhin das Binary aus dem neueren Programm kopieren, und es "Private Tax 2010" nennen.

Als Letztes muss nun noch das Cache von Mac OS X überlistet werden, welches immer noch fest glaubt, die installierte App sei PowerPC-only, und darum den Start verweigert. Das geht, indem die ganze "Private Tax 2010"-App (aus /Applications/Private Tax 2011) an einen anderen Ort hin und wieder zurück kopiert wird. Dabei verschwindet die Verbotstafel auf dem Icon, und ab jetzt ist der Start ganz normal möglich.

Das alles selbstverständlich, wie bei jedem Hack, nur ganz auf eigenes Risiko durchführen!

Bei mir hat es prima funktioniert, ohne Nebengeräusche beim Benutzen von PrivateTax nachher.

Fröhliches Steuererklärungsausfüllen!

How to make the MacBook Air SuperDrive work with any Mac

Note: for Mac OS X 10.11 El Capitan and later, please see this updated post instead.

(Edited/clarified Nov. 2012, Nov. 2013, Jan 2015 and June 2016)

The story is this - a while ago I replaced the built-in optical disk drive in my MacBook Pro 17" by an OptiBay (in the meantime, there are also alternatives) which allows to connect a second harddrive, or in my case, a SSD.

To be able to continue using the SuperDrive (Apple's name for the CD/DVD read/write drive), the Optibay came with an external USB case which worked fine, but was ugly. And I didn't want to carry that around, so I left it at home and bought a shiny new MacBook Air SuperDrive (by 2012, Apple USB SuperDrive) for the office.

It just didn't occur to me that this thing could possibly not just work with any Mac, so I didn't even ask before buying. I knew that many third-party USB optical drives work fine, so I just assumed that would be the same for the Apple drive. But I had to learn otherwise. This drive only works for Macs which, in their original form, do not have an optical drive.

At this point, I started to search the net, finding hints, disassembling Mac OS X USB drivers and finally patching code in a hex editor which was the first, but ugly, solution to make the superdrive work, and gave me the information to eventually find the second, much nicer solution presented below. For those interested in the nitfy details of disassembling and hex code patching, the first approach is still documented here.

For actually making the SuperDrive work in clean and easy way, just read on (but note: while it has proven to be a quite safe method, still you'll be doing this entirely on your own risk! Using sudo and editing system files incorrectly can damage things severely!).

Apparently, Apple engineers had the need to test the superdrive with non-MacBookAir computers themselves, so the driver already has an option built-in to work on officially unsupported machines! All you need to do is enable that option, as follows:

The driver recognizes a boot parameter named "mbasd" (Mac Book Air Super Drive), which sets a flag in the driver which both overrides the check for the MBA and also tweaks something related to USB power management (the superdrive probably needs more power than regular USB allows). So just editing /Library/Preferences/SystemConfiguration/com.apple.Boot.plist and inserting the "mbasd=1″ into the "Kernel Flags" does the trick:

[For OS X 10.11 El Capitan onwards please see here for updated instructions instead!]

  1. open a terminal
  2. type the following two commands (two lines, each "sudo" starting on a new line)

    sudo plutil -convert xml1 /Library/Preferences/SystemConfiguration/com.apple.Boot.plist

    sudo pico /Library/Preferences/SystemConfiguration/com.apple.Boot.plist

  3. Insert mbasd=1 in the <string></string> value below the <key>Kernel Flags</key> (If and only if there is already something written between <string> and </string>, then use a space to separate the mbasd=1 from what's already there. Otherwise, avoid any extra spaces!). The file will then look like:

    <?xml version="1.0" encoding="UTF-8"?>
    <!DOCTYPE plist PUBLIC "-//Apple//DTD PLIST 1.0//EN" "http://www.apple.com/DTDs/PropertyList-1.0.dtd">
    <plist version="1.0">
    <dict>
    <key>Kernel Flags</key>
    <string>mbasd=1</string>
    </dict>
    </plist>

    [Important update for users of Trim Enabler (thanks boabmatic!): Since Yosemite, installation of Trim enabler puts another flag "kext-dev-mode=1" into the com.apple.Boot.plist, and, unfortunately, also converts the .plist to binary format which shows as mostly garbage in many text editors (that's what the "plutil" line in step 2 above takes care about: it converts the file back to XML so you can edit it). Note that the system will not boot any more when trim enabler is installed, but "kext-dev-mode=1" is missing! So to apply the "mdasd=1" with trim enabler active, you need to combine both flags, such that the line will read
    <string>kext-dev-mode=1 mbasd=1</string>. For details on Yosemite and Trim Enabler, see here]
    [Update: As CyborgSam pointed out in the comments, the file might not yet exist at all on some Macs. In that case, the pico editor window will initially be empty - if so, just copy and paste the entire XML block from above].

  4. Save (press Ctrl-X, answer yes to save by pressing Y, press enter to confirm the file name).
  5. Restart your machine. That's it!

I tested this [Updated:2013-11-03] on Lion 10.7.2 up to 10.7.4, Mountain Lion up to 10.8.4 and Mavericks 10.9 so far, but I expect it to work for all Mac OS versions that came after the initial release of the Macbook Air Superdrive, which is probably 10.5.3, and is likely to work with future versions of OS X. Just let me know your experience in the comments!

BTW: the boot options plist and how it works is described in the Darwin man pages